Setting Up Tradovate: The Complete Guide for Prop Firm Traders
Everything you need to know — from login to your first trade
For more guides like this, check out my blog →
Tradovate is one of the most popular platforms in the prop trading world — and for good reason. It's browser-based, works on any device, and connects directly to TradingView. If you're getting into futures prop trading, there's a very good chance your account will be on Tradovate.
This guide walks you through everything from your first login to placing your first trade. No fluff, just the steps you actually need.
Which Prop Firms Use Tradovate?
Not all prop firms use Tradovate, but the best ones for futures trading do. Here are two that stand out — both offer $50K Tradovate accounts that can be directly connected to TradingView:
⚡ Lucid Trading
- $50K Tradovate account
- Direct TradingView connection
- Direct funded accounts
- Fast payouts
⚡ Tradeify
- $50K Tradovate account
- Direct TradingView connection
- Simple evaluation process
- Competitive rules
Step 1: Logging In for the First Time
Once your prop firm sends you your Tradovate credentials (usually via email), here's what to do:
1 Go to Tradovate
Open trader.tradovate.com in your browser. Tradovate is fully web-based — no downloads required. It also has a desktop app if you prefer that.
2 Log in with your prop firm credentials
Use the username and password provided by your prop firm. Do NOT create a new account — your firm has already set one up for you.
3 Select your account
In the top-right corner, you'll see an account selector. Make sure your prop firm's funded account is selected (it will usually have a name like "SIM" or the firm's name in it).
Step 2: Understanding the Interface
When you first log in, Tradovate will show a default layout with multiple modules on screen. Here's what it looks like:
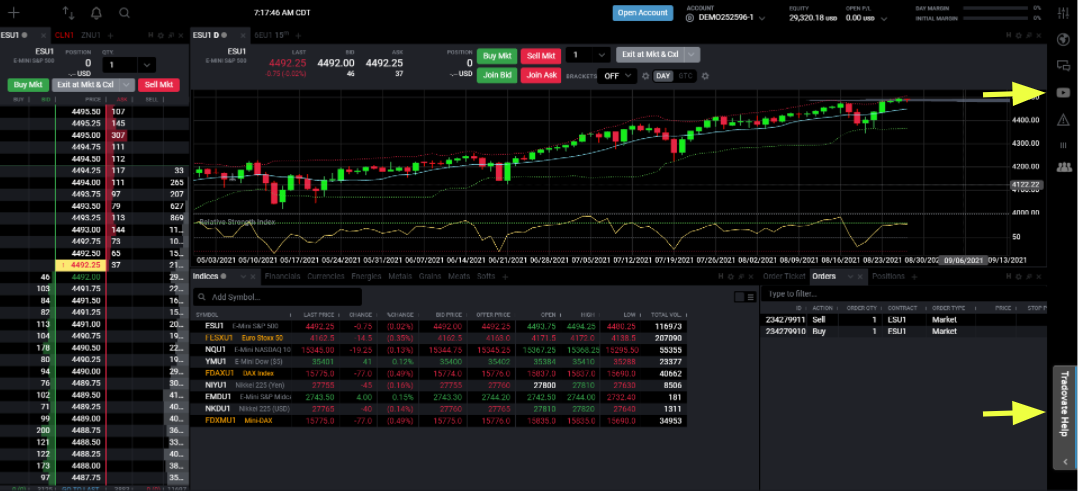
The default Tradovate home screen — DOM ladder, chart, market overview, and positions
It can look overwhelming, but you only need a few things.
The Key Modules
| Module | What It Does | Do You Need It? |
|---|---|---|
| Chart | Price chart with candlesticks, indicators, drawing tools | Essential (unless using TradingView) |
| DOM Ladder | Depth of Market — shows bid/ask levels, lets you place orders visually | Useful for scalpers |
| Order Ticket | Manual order entry (market, limit, stop) | Optional |
| Positions | Shows your open positions, P&L, and fills | Essential |
| Performance Center | Detailed reports on your trading performance | Good to have |
Customizing Your Layout
Tradovate is modular — you can drag, resize, add, and remove any panel:
Remove or add tabs — Use the ✕ to close a tab and the + to add new ones within a module:
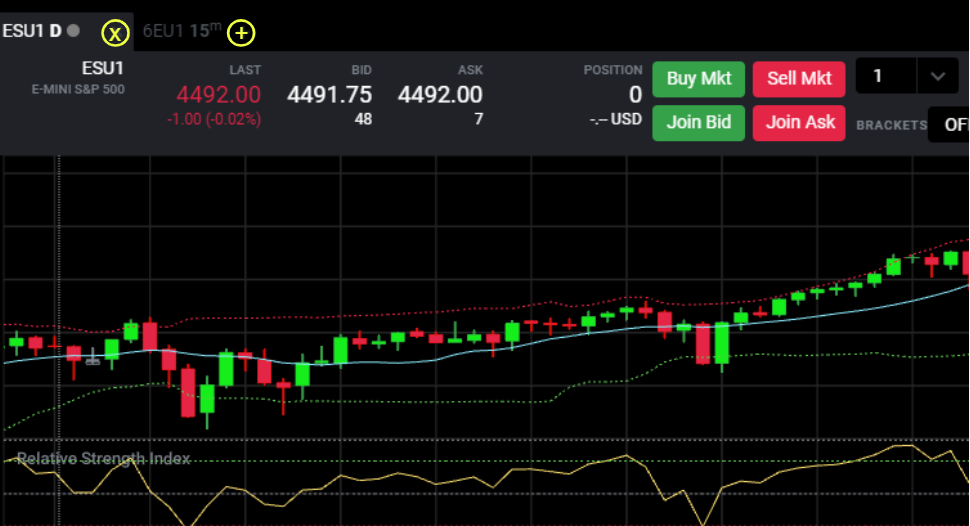
The ✕ and + buttons on module tabs — highlighted in yellow
Add new modules — Click the large + icon in the top-left corner of the screen:
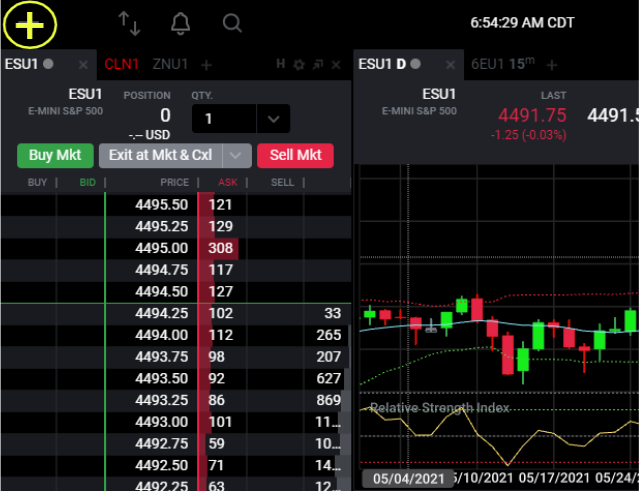
The large + icon in the top-left opens the module selector
You'll see a drag-and-drop screen with all available modules. Just drag what you want onto your workspace:
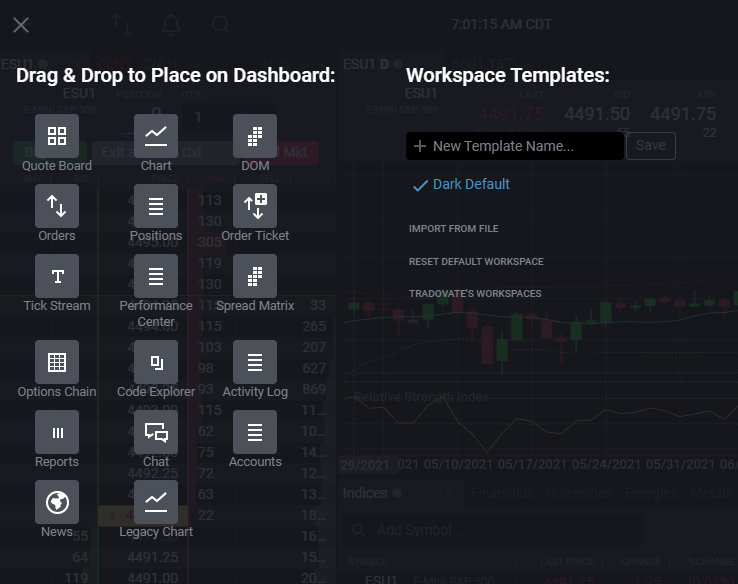
Drag modules to your screen and save layouts as Workspace Templates
Step 3: Connecting to TradingView
If your prop firm supports it (Lucid Trading and Tradeify both do), you can connect your Tradovate account directly to TradingView and trade from there. This is the setup most traders prefer.
Open TradingView
Go to tradingview.com and open any futures chart (e.g., ES1!, NQ1!, MNQ1!).
Open the Trading Panel
At the bottom of your chart, click on "Trading Panel" and select Tradovate from the list of brokers.
Log in with your prop firm credentials
Enter the same username and password your prop firm gave you. Authorize the connection.
Select your account
Once connected, make sure you select the correct account from the dropdown in the trading panel. You should see your balance and positions.
Start trading from TradingView
You can now place orders directly from your TradingView charts — market orders, limit orders, brackets, the works.
Step 4: Placing Your First Trade
Whether you're trading from Tradovate or TradingView, the basics are the same.
Market Orders (Quick Entry/Exit)
The fastest way to enter a trade. In Tradovate, use the Buy Mkt and Sell Mkt buttons at the top of the chart. To close everything, hit Exit at Mkt & Cxl — this will flatten your position and cancel all pending orders.
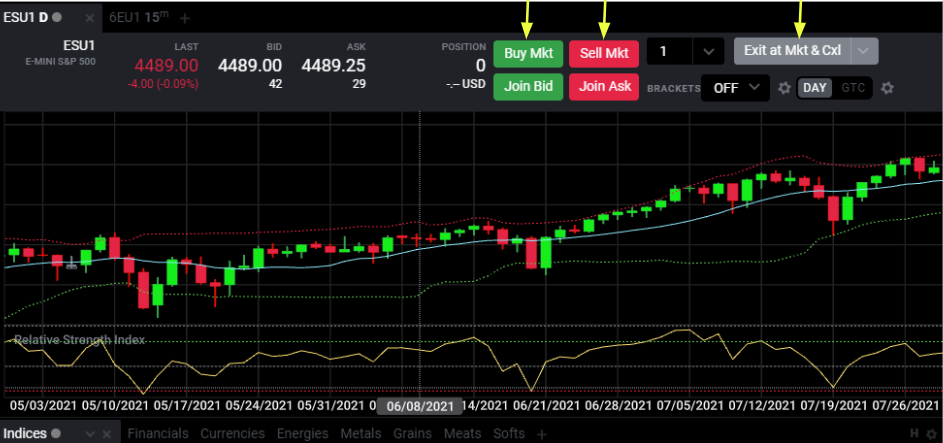
Buy Mkt, Sell Mkt, and Exit at Mkt & Cxl — the three buttons you'll use most
Limit Orders
Click on the chart at the price level where you want to enter. An amber line will appear — adjust it to your exact desired price, then click Buy or Sell.
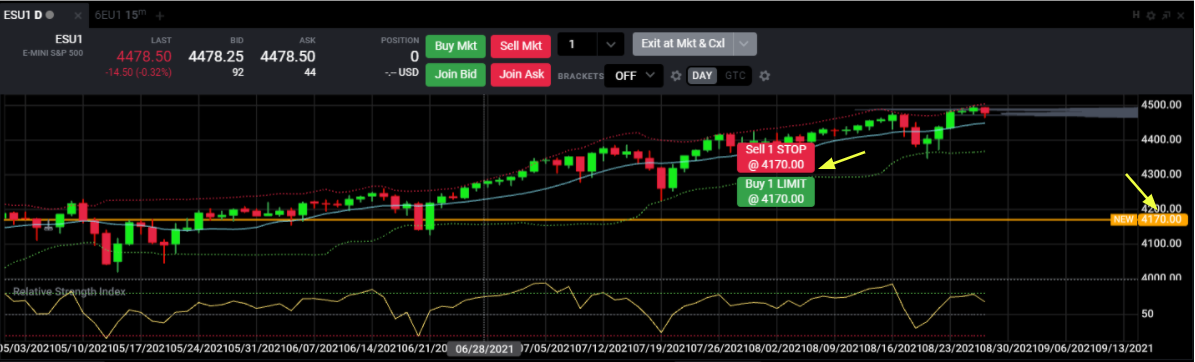
A limit buy order and a stop sell placed directly on the chart
Bracket Orders (Stop Loss + Take Profit)
This is the one you'll use most as a prop trader. A bracket order automatically places your stop loss and take profit when you enter a trade.
1 Open bracket settings
Click the ⚙️ cog icon next to the "BRACKETS" dropdown at the top of the chart.
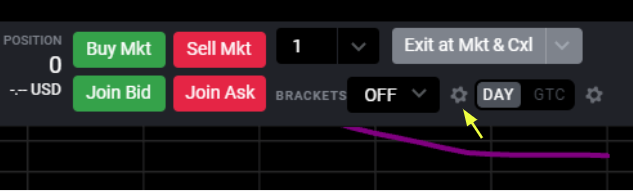
The cog icon next to BRACKETS — click it to configure your TP and SL
2 Configure your bracket
Set your Take Profit and Stop Loss in ticks. Choose TP + SL as the type. Save it with a name (e.g., "10-tick bracket") so you can reuse it.
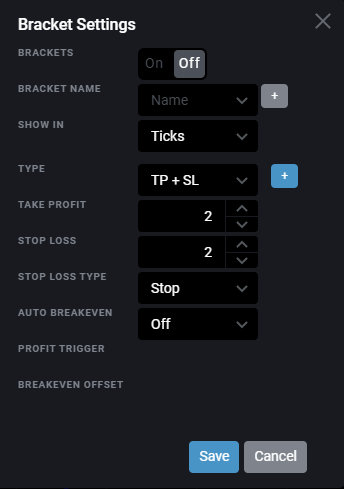
Bracket settings — set your TP, SL, and save it as a preset
3 Turn it on and trade
Select your saved bracket from the BRACKETS dropdown. When you enter a trade, your stop loss and take profit will be placed automatically. You can drag them on the chart to adjust, or hit the ✕ next to them to cancel.
Step 5: Things to Know for Prop Firm Trading
Trading on a prop firm account isn't exactly the same as trading your own account. Here are the key differences to keep in mind:
Check your contract size
Make sure you're trading the right contract. Most prop firms limit you to micros (MES, MNQ, etc.) until you scale up. Trading a full ES contract when you're only allowed micros = instant rule violation.
Know your position size limit
Your prop firm will set a max number of contracts. In Tradovate, the quantity is shown next to the Buy/Sell buttons. Double-check it before every trade.
Watch for the daily reset
Tradovate resets P&L at the end of each trading day (5:00 PM CT for CME futures). Your EOD trailing drawdown updates at this time — not during the session.
Don't hold through the close
Most prop firms require all positions to be flat before the daily close. Holding overnight without permission can get your account closed.
Avoid news events (if your firm requires it)
Some firms restrict trading around high-impact news. Check your economic calendar before the session opens.
Step 6: Monitoring Your Performance
Tradovate has a built-in reporting suite that tracks everything — P&L, orders, position history, cash history, and more.
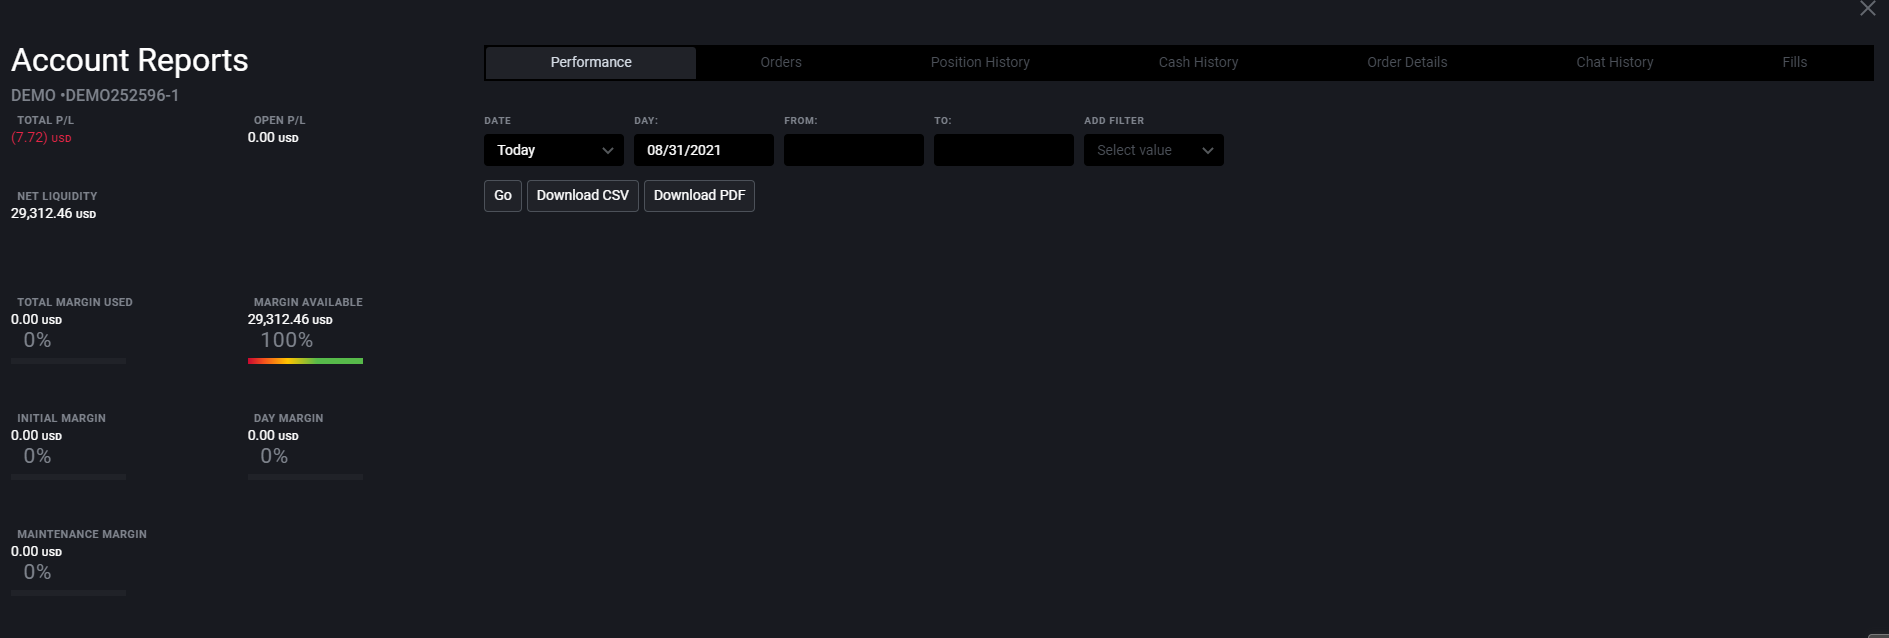
Account Reports — pull performance data, download as CSV or PDF
1 Add the Performance Center module
Click the + button in the top-left → drag "Performance Center" onto your screen.
2 Access Account Reports
Go to the Reports module to see Performance, Orders, Position History, Cash History, Order Details, and Fills. Set your time range and hit Go.
3 Export your data
You can download your reports as CSV or PDF — useful for keeping a trading journal or tracking your progress toward payout targets.
Quick Tips for Prop Firm Traders on Tradovate
Link your modules — Click the colored dot next to the symbol on any tab. Set it to the same color across your Chart, DOM, and Positions panel — when you change the symbol on one, they all update together.
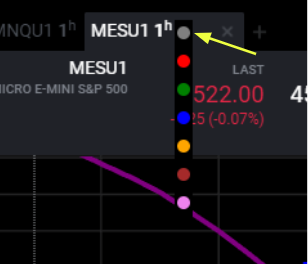
The colored dots next to the symbol — match colors to link modules
- Lock your chart toolbar: Hover over the chart to reveal the toolbar, then click the lock icon at the bottom of the menu. This keeps drawing tools and settings visible at all times.
- Use the "Continuous AutoFit" toggle: If your chart keeps jumping around, go to Chart Settings and toggle off Continuous AutoFit.
- Set bar countdown alerts: Go to the cog icon in the top-right of your chart → "Bar countdown settings." Useful for timing entries on candle closes.
- Save your workspace: Once your layout is set, save it as a Workspace Template. If anything goes wrong, you can reload it instantly.
Final Thoughts
Tradovate looks intimidating at first, but once you strip it down to just what you need, it's actually one of the cleanest platforms out there. And if you connect it to TradingView, you get the best of both worlds — TradingView's world-class charting with Tradovate's execution.
Remember: your prop firm provides the account. You just log in, set up your brackets, and focus on what actually matters — taking good trades and managing your risk.
- Receive Tradovate login credentials from your prop firm
- Log in at trader.tradovate.com (do NOT create a new account)
- Select the correct account in the top-right dropdown
- Clean up your layout — remove modules you don't need
- Set up bracket orders (stop loss + take profit)
- Save your workspace as a template
- Connect to TradingView (if your firm supports it)
- Verify your contract type and position size limits
- Take your first trade
- B — Buy market order
- S — Sell market order
- Esc — Cancel/close dialogs
- + / - — Zoom in/out on chart
- Click on chart → Place limit order at price level
- Drag order line → Move limit/stop order